DonShockley
T.C. Member-
Posts
493 -
Joined
-
Last visited
-
Days Won
51
Content Type
Profiles
Forums
Gallery
Everything posted by DonShockley
-
The microphone is behind the center grill between the two side holes. You can see it in the attached photo. There is a connector behind each hole so some option available must use them for something.
-
I wasn't able to find the post, but I seem to recall somebody mentioning seeing the upfitter connector while doing some other work. As best I can recall, it was just an unused connector taped at one of the Y-splits in the wiring harness that runs along the passenger side towards the rear fuse box. I remember there being a photo posted but it didn't show much except a bulge under the black tape covering just like the rest of the harness. If there's not any more definite info by the time I special order my next TC, I am going to make sure the dealer knows ahead of time that he better be able to show me the Upfitter connections I ordered or I will assume it isn't there and I didn't get what I ordered. If I pay extra for it, the dealer better be able to prove it's installed.
-
Accessing Fuse Panel in passenger compartment
DonShockley replied to TheLaird's topic in Accessories and Modifications
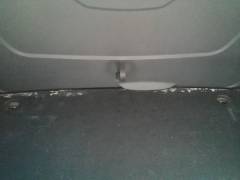
I have a US 2015 Transit Connect so not exactly the same, but here's mine. The photo is looking straight up from the floor mat, bottom edge of glove box is at the top of the photo. You don't actually need to remove the glove box but it does help. There is a cover that can be released to expose the fuse box. To remove the cover, you need to remove the round black pin (one on each side) seen in the photo below. Pry under the head (there are slight recessed areas seen at the roughly 11to1 and 5to7 o-clock positions) and it will pop out about 1/4 to 1/2 inch. That will let the expanded outer sides underneath to collapse and the pin can be pulled out freeing the panel to drop down. If you do much work with these type of pins, a set of push pin pliers and panel clip pliers from Harbor Freight is well worth the $20 for both. https://www.harborfreight.com/push-pin-pliers-67400.html https://www.harborfreight.com/panel-clip-pliers-67399.html They make it a lot easier to remove the pins, although access room for the tool can sometimes be an issue. On my US 2015 Transit Connect Wagon, you can remove the glove box by removing the hinge pins then tilting the box slightly so the side catches clear the sides. The hinge pins are very hard to see and I didn't figure them out until after I had cracked the plastic slots on one side. You almost have to stick your head all the way in the foot well and look almost directly up to see them. If your Euro Tourneo is the same setup, you should be able to see the black heads of the pins on the hinge ends closest to the center of the glove box. Work a pry bar or screwdriver under the heads and push them towards the middle. There is a raised area on the pins that helps lock the pin in place, but it will slid out with just a firm force. No clip to be pried or anything. That's how I cracked mine, trying to pry the raised part of the pin down into the slot thinking that would release the pin. -
cross bars for 2017 TC Wagon
DonShockley replied to Jatoba's topic in Cargo, Hauling, Towing & Upfit Packages
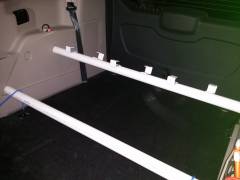
That eBay one might technically fit once the bottom lip is cut down, but it likely wouldn't be very secure. The Ford rails rely on the crossbar mostly contacting the outside of the rail with a relatively small lip on the inside to lock it in. As you tighten the Ford crossbar, it pinches the rail by moving towards the outside at the same time it moves in the upward direction to hook under the inside lip. Here's a couple photos of the Ford rails on my 2015 TC Wagon (not tightened down) and a closeup of the clamping mechanism on the Ford crossbars. (That's 2 crossbars taped together in the photo, but you can still see the details best on the left side crossbar. The rail would roughly be where the blue tape in the background can be seen.) -
Rear door slamming into me in high wind!
DonShockley replied to Boomerweps's topic in Accessories and Modifications
If you don't have the scrap plastic, a very cheap source I've used in the past for thin stiff plastic stock is cutting boards. Just a couple bucks at most local stores. -
Rear door slamming into me in high wind!
DonShockley replied to Boomerweps's topic in Accessories and Modifications
When looking at how you both did your ends, a couple methods I have used in the past on other projects came to mind that you might find useful. I did a quick mockup using some junk laying around the house so I could post some photos. If you just need a straight spreader bar, a piece of PVC with eyebolts at the ends would work. I've done similar before by heating up the ends of the PVC until it softens, then inserting the nuts. If you match the PVC interior diameter to be a bit smaller than the nuts, it will hold the nuts well once it hardens. You can even bend in the edges to make it almost impossible for the nut to pull out. For even more rigidity, use a longer coupling nut instead of thin regular nut to keep the bolt aligned with the pipe better. And when attaching eye bolts to conduit without it poking out the backside, you can use one nut inside the conduit instead of two on either side. In can be a bit tricky getting the nut on the bolt, but the whole thing wedges pretty firmly into place once the end of the bolt hits the opposite interior side. -
Unfortunately, it looks like mine have a different pattern. But here's photos with measurements of the Ford OEM nuts and removal tool. It looks like the cap is already off. One possible solution would be to use an oscillating tool to cut a slot in the end of the nut and use a very large screwdriver or flat bar stock to get it off.
-
After trying to help a guy several years back who was stranded with a flat and no key, I swore I would never use locking nuts. When I saw them on my TC prior to purchase I made sure to make replacing them part of the deal and forced the dealership to be the ones to do the swap. I still have the Ford locking nuts and key stored away. I've kept them to pass on to the next owner in case they are fans of locking lug nuts since my TC came with upgraded wheel options. If you can take a photo of you lugnut I can see if it looks like a match and can let you borrow the key to try on yours if it is.
-
Not specific to 2018 wagons, but several users on the forums have done special orders. About 6 months from order to delivery seems to be fairly typical. I don't recall hearing of anything shorter than 4 months which is where you are now. Of course, that's just my potentially faulty memory. You would need to do a search to see specifics from prior buyers. And a lot of the delay seems to be dependant on when the order is placed in relation to certain parts of the annual production cycle. I seem to recall somebody mentioning that custom orders are only built at certain times.
-
In my 2015 LWB TC to remove the glove box you just have to slide out the hinge pins. Unfortunately, I didn't learn the pins just slide out until I had broken a piece off the hinge. But not enough to harm it's operation. When you look at it, there appears to be a catch in a slot that needs to be released. But it's not really a catch. It's just a ridge that pops into the opening to keep the pin from sliding out accidentally. One end of the pin has a head, in my case the head ends are towards the middle of the glove box. Hook a screw driver or a pry bar under the head and push the pin towards the middle and it just pops out.
- 121 replies
-
- bike
- conversion
-
(and 3 more)
Tagged with:
-
I've used cordura seat covers in my last 2 vehicles and love the durability and easy cleanup. I work at a water plant and sometimes after working extra shifts fixing a leak I just hose off the majority of the mud and head home still wet and dirty. Just a damp rag does the job cleaning up whatever ends up on the seat covers. If I remember correctly, here's the two places I got them from: http://www.gtcovers.com/seat-covers/fabrics.asp?fabric=waterproof https://www.coverking.com/heavy-duty-ballistic.html
-
Vehicle Health Report - Yes or No
DonShockley replied to AVguy2's topic in Audio, Navigation and SYNC
You need to have a Sync Owner account set up and your phone connected to your Sync system to be able to use the phone to send the vehicle health report via an email to the address provided in your sync account. Once both are set up, while the vehicle is parked but still running, you just have to hit the voice recognition button and say "Vehicle Health Report" to generate and send the report. At least that's how I do it. Here's a copy/paste (cleaned up and options table converted to list) from the manual for my 2015 TC XLT (page 287): Vehicle Health Report WARNING: Always follow scheduled maintenance instructions, regularly inspect your vehicle, and seek repair for any damage or problem you suspect. Vehicle Health Report supplements, but cannot replace, normal maintenance and vehicle inspection. Vehicle Health Report only monitors certain systems electronically monitored by your vehicle and will not monitor or report the status of any other system, (such as brake lining wear). Failure to perform scheduled maintenance and regularly inspect your vehicle may result in vehicle damage and serious injury. Note: This feature is only available in the United States. Note: Your Vehicle Health Report feature requires activation before use. Visit www.SYNCMyRide.com to register. There is no fee or subscription associated with Vehicle Health Report, but you must register to use this feature. Note: This feature may not function properly if you have enabled caller ID blocking on your cellular phone. Before running a report, review the Vehicle Health Report Privacy Notice. Note: In order to allow a break-in period for your vehicle, you may not be able to create a Vehicle Health Report until your vehicle odometer has reached 200 miles. Note:Cellular phone and SMS charges may apply when making a report. Register for Vehicle Health Report and set your report preferences at www.SYNCMyRide.com. After registering, you can request a Vehicle Health Report (inside your vehicle). Return to your account at www.SYNCMyRide.com to view your report. You can also choose for SYNC to remind you automatically to run reports at specific mileage intervals. The system allows you to check your vehicle's overall health in the form of a diagnostic report card. The Vehicle Health Report contains valuable information such as: • Vehicle diagnostic information • Scheduled maintenance • Open recalls and Field Service Actions • Items noted during vehicle inspections by an authorized dealer that still need servicing. You can run a report (after your vehicle has been running a minimum of 60 seconds) by pressing the voice button and saying "Vehicle Health Report", or pressing the phone button. To run a report using the phone button: 1. Press the phone button to enter phone menu. 2. Scroll to select Vehicle Health, and then press OK. 3. Scroll to select from the following options: Vehicle Health Report options: 1. User Preferences: Press OK to select and enter the menu. Scroll to select from: a. Automatic Reports: Press OK to and select On or Off. Select On to have SYNC automatically prompt you to run a health report at certain mileage intervals. (You must first turn this feature on before you can select the desired mileage interval.) b. Mileage Intervals: Press OK. Scroll to select between 5000, 7500 or 10000-mile intervals and press OK to make your selection. c. Return: Press OK to exit the menu. 2. Run Report? Press OK for SYNC to run a health report of your vehicle's diagnostic systems and send the results to Ford where it combines with scheduled maintenance information, open recalls and other field service actions and vehicle inspection items that still need servicing from an authorized dealer. 3. Return: Exit the current menu. Vehicle Health Report Privacy Notice When you create a Vehicle Health Report, Ford Motor Company may collect your cellular phone number (to process your report request) and diagnostic information about your vehicle. Certain versions or updates to Vehicle Health Report may also collect more vehicle information. Ford may use your vehicle information it collects for any purpose. If you do not want to disclose your cellular phone number or vehicle information, do not run the feature or set up your Vehicle Health Report profile at www.SYNCMyRide.com. See www.SYNCMyRide.com (Vehicle Health Report Terms and Conditions, and Privacy Statement) for more information. -
I'm just guessing here based soley on the photos of what's being carried, the rack installation as shown, and the location of the dimples being under the crossbar and not under the support feet. The problem may not be the weight of your load causing a down force, but instead it may be the load shape causing an up force due to wind load while driving. I think the dimples may be at spot weld locations attaching the roof sheet metal to the supprt beam underneath. If the brackets attach to the sheet metal and not the framing underneath, wind under the load may be trying to lift the entire flat roof away from the support beam. But again, that's just a guess. After getting the Ford rails for my factory roof rails, up lift was a big concern since my only anticipate use would be for carrying sheet goods which would tend to catch a lot of wind. And the relatively small recess in the rails that the cross bars attached to makes me wonder how much upwards force they can resist. They look to handle down force fine, but may not handle wind lift. Thankfully, I have not needed to use them yet. But when I do, there's going to be a lot of extra strapping to actual vehicle structure, not just the cross bars.
-
How the heck do you jack one of these things up?
DonShockley replied to williaty's topic in Brakes, Chassis & Suspension
Adapter pads are only $10 for 2. https://www.amazon.com/dp/B06WRMSHP2?psc=1 -
Driver and passenger side floor mats.
DonShockley replied to Mcfly's topic in Accessories and Modifications
Weathertech My 2015 TC Wagon had some pins to anchor the factory mats. The Weathertech came with some dircular fittings that clamped to these and there is a recess in the bottom the the WT mat that fits over that fitting. Really secure, no sliding, and takes an effort to lift the WT mat off the fitting. -
Here's the page from the wiring manual for my 2015 TC. If your 2016 is the same, it should be Blue/White.
-
Although it is listed under the Bounce Back feature instead of the One-Touch Up feature, it does mention needing to reset after a battery disconnect and to repeat the procedure if the window does not close automatically. It probably won't hurt to try. (From page 74/75 of my 2015 TC owners manual ) If you have disconnected the battery, you must reset the bounce-back memory separately for each window. 1. Lift and hold the control until the window is fully closed. 2. Release the control. 3. Lift and hold the control again for a few seconds. 4. Release the control. 5. Lift and hold the control again for a few seconds. 6. Release the control. 7. Press and hold the control until the window is fully open. 8. Lift and hold the control until the window is fully closed. 9. Release the control. 10. Open the window and then try to close it automatically. 11. Repeat the procedure if the window does not close automatically.
-
Original add-on fuse wiring (removed)
DonShockley posted a gallery image in Ford Transit Forum Member Albums
From the album: 2015 TC LWB Wagon Modifications
Original install used Auto Store fuse holders and had additional soldered splices and mini fuse leg tap. Replaced with manufactured parts allowing fuse holders to be directly connected at wire ends. -
2015 TC LWB Wagon Modifications
DonShockley added images to a gallery album in Ford Transit Forum Member Albums
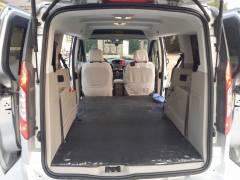
Modifications: 1. Added FZ-1 FuzeBlock behind glove box for accessory wiring. 2. Added USB power port to overhead shelf. 3. Remove seats, build flat cargo floor. -
Prebuilt accessory fuse assembly
DonShockley posted a gallery image in Ford Transit Forum Member Albums
From the album: 2015 TC LWB Wagon Modifications
All crimping and installation done in advance, ready to install at any vehicle fuse box with open mini-fuse and 1/4"-tab slots. Ready to attach user wiring at terminal strip. (Grounds made seperately) -
Rear fuse/terminal strip mockup
DonShockley posted a gallery image in Ford Transit Forum Member Albums
From the album: 2015 TC LWB Wagon Modifications
Mocked up installation of add-on fuse connector and terminal strip for adding accessory circuits. Note: no ground connections on terminal strip as was later done during actual installation. -
Original fuseholder installation
DonShockley posted a gallery image in Ford Transit Forum Member Albums
From the album: 2015 TC LWB Wagon Modifications
Originally used Auto Store fuseholders to supply power to FZ-1 accessory fuse block installed behind glove compartment. Worked fine but all the soldered splices and shrink wrap gave a somewhat sloppy appearance. -
Converted 2015 LWB Wagon into a Van
DonShockley replied to DonShockley's topic in Accessories and Modifications
The side panels in the rear just pull off. It would probably help if you pulled off the top vertical pieces at the rear, since they overlap the bottom pieces slightly. But I didn't and got them off fairly easily. Most of the attachments are just those little plastic pins. There is a bit of a hook fitting at those rear pillars, I forget which piece has the hook and which has the slot. But it just takes a little flexing to get it loose. The hard part is the reinstallation and making sure you have all the pins restarted in the holes before slapping the panel down. I didn't and broke a pin but found replacements on eBay. -
Converted 2015 LWB Wagon into a Van
DonShockley replied to DonShockley's topic in Accessories and Modifications
Yes, there are just a some T50 (if I remember correctly) headed bolts at each corner. The front ones are easy to access just by pulling the plug fasteners and lifting the carpet. In my case I was only removing the center mount, so reaching the back ones was harder since the carpet was still attached at the front corners by the trim on the side mounts. But I left those installed primarily to protect the plastic trim. And it had little effect on usability. The side mounts actually provided nice extra mounting points for anchor straps. I used a T-handled ratchet wrench that allows operating it from the end instead of swinging which is what kept the frustration of installing/removing those center mount bolts down to a tolerable level. The carpet only lifts enough to get one arm in to reach the bolts. But if you are pulling the side mounts also and lift and fold back the entire front section of the carpet, access will be much easier even though removing the plastic trim will involve extra work. I was planning on removing the seats again and reinstalling the plywood floor on my vacation which is in it's last 2 days right now. But I never got around to it out of sheer laziness and some light rain. But when I do, I plan to leave the center mount in place and add an extra cutout to allow for it. That will greatly simplify swapping back and forth since rinstalling that mount was the only hard part about putting the seats back in. Once I run with that for a while and see how it works, I'm going to look at maybe re-doing it as the 3-piece folding design I thought of afterwards. I still need to ask the folks across the street for help getting the single piece design moved in and out since it requires tipping at an angle and holding it that way as you slide it in/out. -
Towing equipment questions
DonShockley replied to AVguy2's topic in Cargo, Hauling, Towing & Upfit Packages
Clarification to my last post since it won't let me edit it: My selfmade diagram is the one on the right in the last photo. The S405 connector is in the top left of that add-in page. Did some more looking, that S405 connector looks to be near the left tailight and the 4397ABC connectors near the right taillight. Here's some photos I took back in 2015 when I was doing my project that show the area where the 4397ABC connectors should be and it doesn't look like they are present. But then again these photos weren't taken while looking for them.- 60 replies
-
- sway control
- hitch
-
(and 1 more)
Tagged with:

.jpg.27275ffa3d27b25357bf400a2296569e.jpg)

.jpg.69eca13517de5c93987a5b29662a8528.jpg)
.jpg.21ead1c89fe77648221e091ff8f98390.jpg)
.jpg.e63fb622a15fa393164a06cb253a11c1.jpg)
.jpg.8ad29a20b3495866393872d99ea5daa3.jpg)
.jpg.9a1657a9f2b9523e32ac5e445679e33a.jpg)
.jpg.6c9a1958e87fa24f885887714a40cdac.jpg)
