-
Posts
500 -
Joined
-
Last visited
-
Days Won
41
Content Type
Profiles
Forums
Gallery
Everything posted by 103west43rd
-
My AM reception on the stock AM/FM (no CD) model 1500 RDS radio was also lousy. I replaced the stock antenna with the largest one I could find, 18 inches. It did not make a difference. I then replaced the radio with the AM/FM/CD model 6000CD. AM went from lousy to just poor on the 6000CD model.
-

Setting the Date? It's stays 2009!
103west43rd replied to jefflaur1's topic in Audio, Navigation and SYNC
Did you ever solve your date issue? I have the same problem with my radio. -

2011 Transit Connect lighting switch in a 2010 Transit Connect
103west43rd commented on 103west43rd's gallery image in Ford Transit Forum Member Albums
-
-

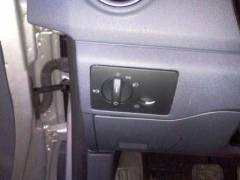
2011 Transit Connect lighting switch in a 2010 Transit Connect
103west43rd posted a gallery image in Ford Transit Forum Member Albums
From the album: 103west43rd
-

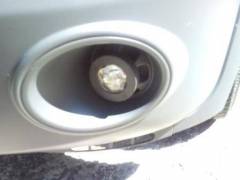
Hella light in 2010 Transit Connect
103west43rd posted a gallery image in Ford Transit Forum Member Albums
From the album: 103west43rd
-

Ham, CB or business radio
103west43rd replied to ncranchero's topic in Accessories and Modifications
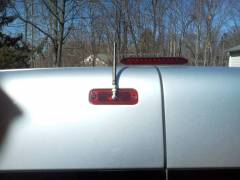
I added a picture of the antenna mount to my Photo Gallery. Let me know if you want the details of the UK dealer and the part number. -

Ham Radio antenna mount on rear door
103west43rd posted a gallery image in Ford Transit Forum Member Albums
From the album: 103west43rd
-

Ham, CB or business radio
103west43rd replied to ncranchero's topic in Accessories and Modifications
Very nice installation. Here is what I did for an external antenna for my Ham Radio 2 meter handheld. I had purchased a third brake light from an European Ford Dealer. it fits in the upper left rear door where we have a blank panel. My plan was to remove the roof mounted third brake light and mount my antenna in the hole on the roof. The third brake light would be replaced by the light in the door. I decided not to deal with the problems trying to get the Transit Connect through state inspection because of the modification. What I did was drill a hole through the center of my European brake light (after removing the bulb mounting) and mounted a BNC right angle connector. I then ran a coaxial cable inside the left side of the van, through the flexible hose to the left door and then up to the brake light, now my antenna mount. I have the handheld sitting in the front cup holder in the center console. I am using a rubber duckie antenna and will continue to experiment with some homebrew mobile antennas. -
I have been looking for a front push bar. The only ones I found were in europe and too expensive to ship. They were also ugly. I finally found a supplier here in the US. Aries Automotive makes two styles of push bars for the Transit Connect. I called them only to find they did not sell directly to the retail public. They said to call any aftermarket truck retailer that handles Aries and they would order it. Well after calling and emailing Carid and Realtruck I was told by both, they would not order the push bar even though they carry the Aries products for other vehicles. I finally found SVCUSTOMS. They list both styles of push bars. The price was right. I bought the smaller of the two push bars. I have installed driving lights in my front grill and the larger of the two bars protects the grill but would block some of the beam. SVCUSTOMS was very nice to deal with. They have a real person answer the phone! Installation was simple, no holes to drill. 20 minutes start to finish. It gives the front of the Transit Connect a more commercial look. In fact, for those of you who carry around traffic cones, they make an attachment to carry the cones that fits on the push bar. A back bar is also available. All the information, installation instructions, pictures and pricing you need are on the SVCUSTOM.COM web site.
-

2011 Mirrors for a 2010
103west43rd replied to skurtz's topic in Glass, Lenses, Lights, Mirrors, Window Tint & Wipers
Once again, find another Ford dealer. A proper Ford dealer parts department will sell you the glass for the 2011 and photocopy the page out of the workshop manual with the instructions on how to replace the glass. That is what my dealer does for me on many of my projects. The glass is held on with three tabs that are released by moving the position of the glass to the full in position on top and the full in position on the side closest to the door. You can then get a screwdriver behind the mirror to release the tabs. The new glass just snaps into place. -

2011 Mirrors for a 2010
103west43rd replied to skurtz's topic in Glass, Lenses, Lights, Mirrors, Window Tint & Wipers
You will have to find another Ford dealer. Glass is available for the 2010 Transit connect. Right side 9T1Z 17K707 C $41.97, Left side 9T1Z 17K707 D $28.32, Power Right side 9T1Z 17K707 A $31.75, Power Left side 9T1Z 17K707 B $20.68. I do not have the part numbers for the 2011, but I do not see why the glass would not be available. -
I have an interest in the radio. I will look for your listing next week. Good luck with your project!
-

Euro brake light blockout part number needed
103west43rd replied to vectorpickle's topic in Exterior Parts & Panels
9T1Z 13A656 AA, It needs to be painted to match your Transit Connect. -
I added DRL to my 2010 Transit connect. My model did not come with factory DRL. Adding the feature was very simple. The factory wiring is included even if the model does not have the option. All you have to do is add the factory relay to the existing DRL circuit. Here is how...... The factory relay number is 5L3T-AA crossreferenced to 5L3Z-14N089-AA. Cost is about 20 dollars. The relay is installed in the Battery Junction Box (BJB) under the hood, behind the battery. Take off the cover to the BJB. The left side of the BJB contains three 5L3T-AA relays. There is a empty socket for a fourth. Plug in your relay and that's it!
-

Sliding Door Window Addition
103west43rd replied to carole293's topic in Accessories and Modifications
The factory window might look best. You can also try http://transitconnectwindows.com/ to compare prices. -

Rear Door Storage Pockets
103west43rd replied to Hal's topic in Cargo, Hauling, Towing & Upfit Packages
The Adrian catalog number was ASSLPTC. -

Rear Door Storage Pockets
103west43rd replied to Hal's topic in Cargo, Hauling, Towing & Upfit Packages
The rear door panels were the first item I changed when I bought my Transit Connect last August. I purchased them from Adrian Steel, www.inlad.com. They do not have the netting. They were meant for adding a few extra inches when carrying a six foot ladder inside a van with a partition. I just checked the Adrian web site and they do not seem to list the panels. Still might be worth the call/email. The cost was $79.39 -
I obtained the light switch from my local Ford dealer. That is the American 2011 part number. I thought about replacing the front bumper cover with the 2011 style. The problem is the cost. The bumper cover in gray is over $250. I did not price the fog lamp units.
-
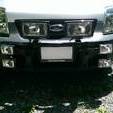
I have been following this fog light post for many months. Here is what I have started. The post from Hal gave me the idea to first replace the lighting switch. The switch with two fog lamp postions, front and rear, as used in Europe, had an issue. The switch bezel was of a different design. When the pictures of the 2011 Transit Connect, which has front and rear fog lamps as an option, began to be posted last month, I looked very closely and noticed there were two icons for fog lamps on the bezel. I ordered the 2011 Ford Transit Connect lighting switch from my Ford dealer. Part number SW-6877, BT1Z-11654-A. Sure enough, it has two positions for fog lamps, just like Hal mentioned. Pull it out to the first stop for front fog lamps, and pull again to the second stop for rear fog lamps. The switch is a direct replacement, pin 83b is the +12 volts for the front fog lamp position, use it to enable a relay to power your front fog lights. Funny thing is, pin 83b is broken off on the original light switch! My next step will be to install fog lamps in place of the "juicers". I have doubts the fog lamps from eBay/Bulgaria will fit but would like to hear from someone who tried. I think the fog lamps from the 2011 Transit Connect will have the same issue. I do not think just cutting out the back of the "juicers" will give the fog lamp housings enough room to sit back far enough. Any information on fog lamps will be appreciated. Here is my update. it has been a long time coming! I looked for lighting that would be a easy fit in the "juicer" location. After many months and many web pages I found Hella HL88708 Optilux Projector work lamps. They are not listed as fog lamps or even driving lamps. Work lamps flood the area with light, no cut off top or bottom. After seeing how easy they would be to mount, I bought a pair to try out. Drill a 1 3/4 inch hole right down the center of the 'juicer" and that's it. The lamp mounts from the back with a large, 2 inch nut that tightens to the back of the "juicer". As for their lighting ability, lets say you would not be able to leave them on in traffic, they are bright! I was not expecting that much light from a 893 bulb with 37.5 watt output. The projector glass really makes a difference. The light projects further then the headlamps on low beam. So if you are looking for more light than fog lamps, this may be the way to go. I bought them (about 20.00 each) from WWW.RALLYLIGHTS.COM which is Susquehanna MotorSports. Nice people to deal with and their web site has everything you need to know or need about lighting. I have posted pictures in the gallery of the lamp mounted in my 2010 Transit Connect, also the 2011 lighting switch also mounted in my 2010. The lighting switch worked out quite well. The front fog lamp position allows the fog lamps to be on in the parking light position as well as the headlamp position. This fog lamp string started in November of 2009. Madlock coined the term "juicer" (perfect description) and JWWOODY up to now has been the only one to actually post a completed fog light installation. Has anyone else completed a fog lamp install on a 2010 Transit Connect? Now that I have the wiring and relay in place, I will continue to look for proper fog lamps. For now, since I live out in the country, I will have no problem finding reasons to turn on my new lighting.


