

DonShockley
-
Posts
493 -
Joined
-
Last visited
-
Days Won
51
Content Type
Profiles
Forums
Gallery
Posts posted by DonShockley
-
-
Mine were bought from GT covers because that website had better photos and offered sample swatches. But my understanding from other people's comments online is that they are the same company as Precision Covers.
-
..... I bought a wagon because I ended up getting a great deal on it, but I wanted a cargo van. .......
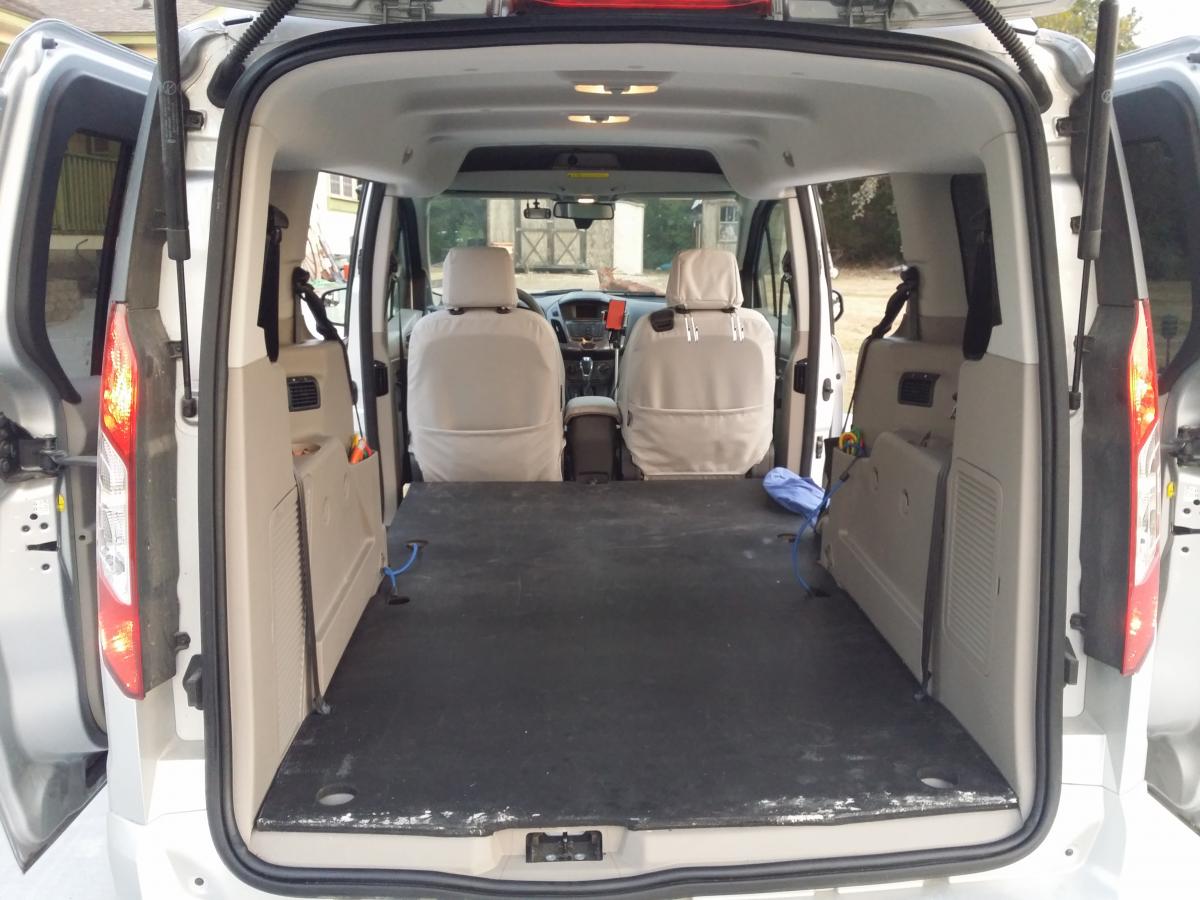
That's exactly what happened to me. I was planning on custom ordering a van with the special features I wanted, like the LWB and rear liftgate since all the vans had cargo doors and most were SWB. But the wagon had most of what I wanted plus the extra insulation for the Texas heat and had some great incentives at the time. Here's what the wagon looks like with seats removed and flat plywood floor with rubber mat installed.

-
When I was researching my 2015 TC purchase I saw mention of removable seats in the online manual. After I ended up buying a LWB wagon, I was surprised when I saw no way to just pop out the seats. It turns out only the short wheel base 5 passenger version has the removable 2nd row seats.
However, I decided to remove the seats in my wagon anyway to install the seat covers. Each seat is held in with four T50 bolts and only takes a few minutes to remove. The 3rd row seats have the bolts at each corner of the seat frame and you do need to slide the seat forward and back to access each set of two. The second row seats have pairs of bolts at the front end of each seat rail. These are easy to access with the seat unfolded. Once the bolts are removed it does take a little lifting and wiggling to break the seats loose because there are also locating posts on the bottom of the rails that fit into holes in the floor. But once these are popped out, the seats just lift out. With just myself, the wider part of the 2nd row was a bit heavy but the others were no problem. It is easier to lift out the 2nd row if you fold them flat after unbolting.
In the end, I liked the extra space available with the seats out so decided to leave it that way since I rarely have more than one passenger. I've been slowly working on modifications over the last couple weeks making a flat load floor for the area and using the extra space for storage. I probably need to do a write up with photos to share the info.
- C Todd Robbins, huddy and Dongoose
-
 2
2
-
 1
1
-
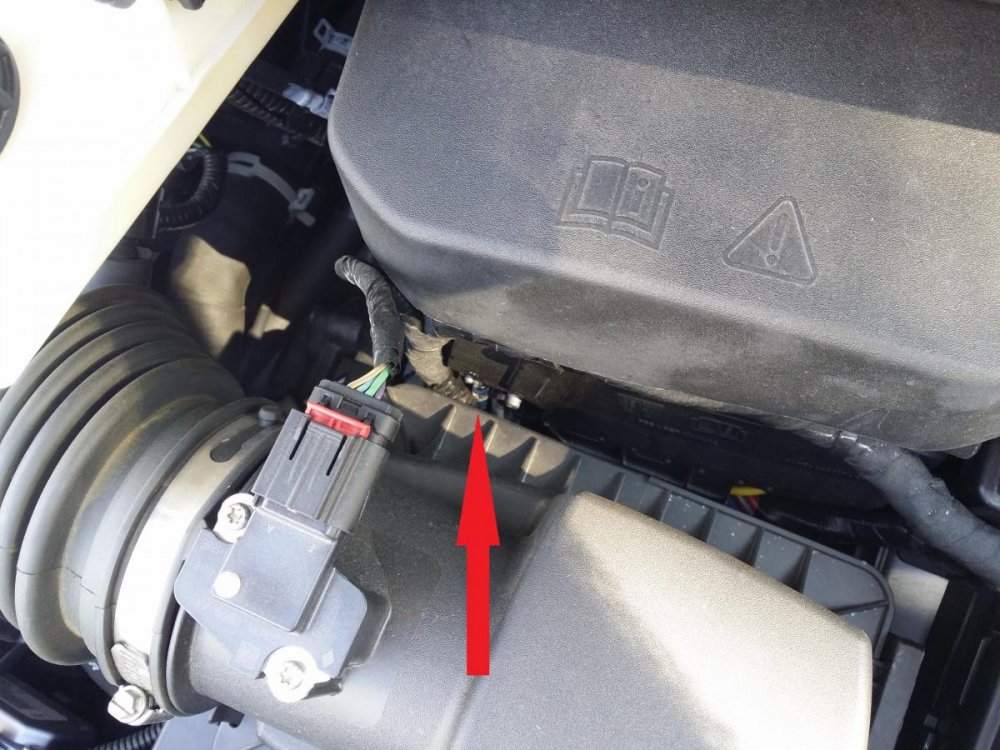
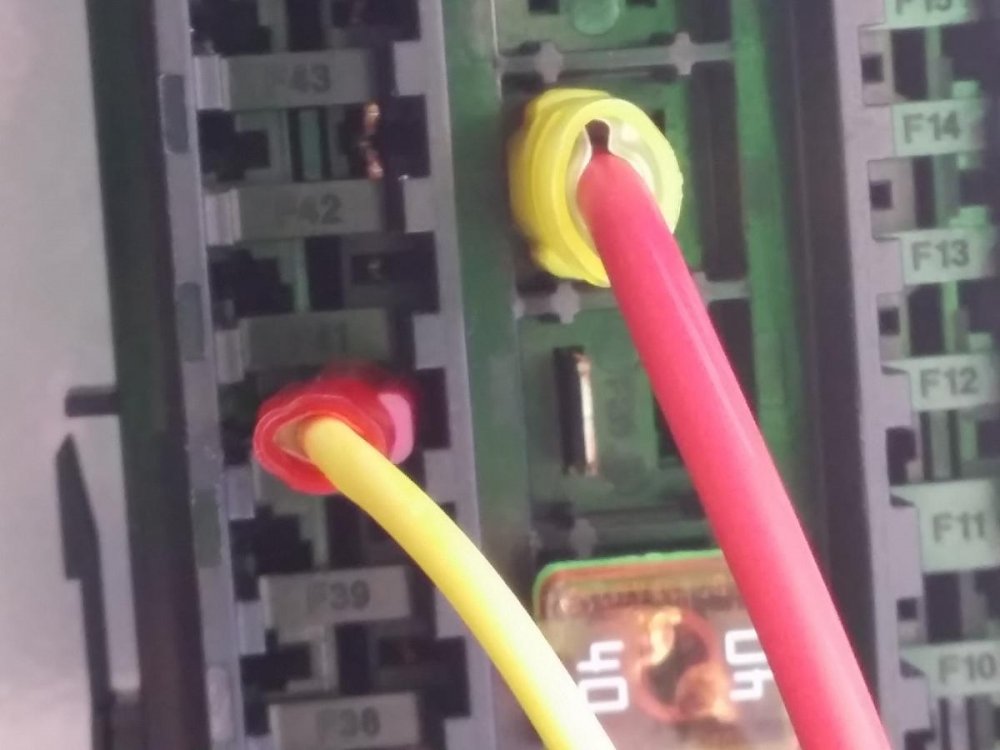
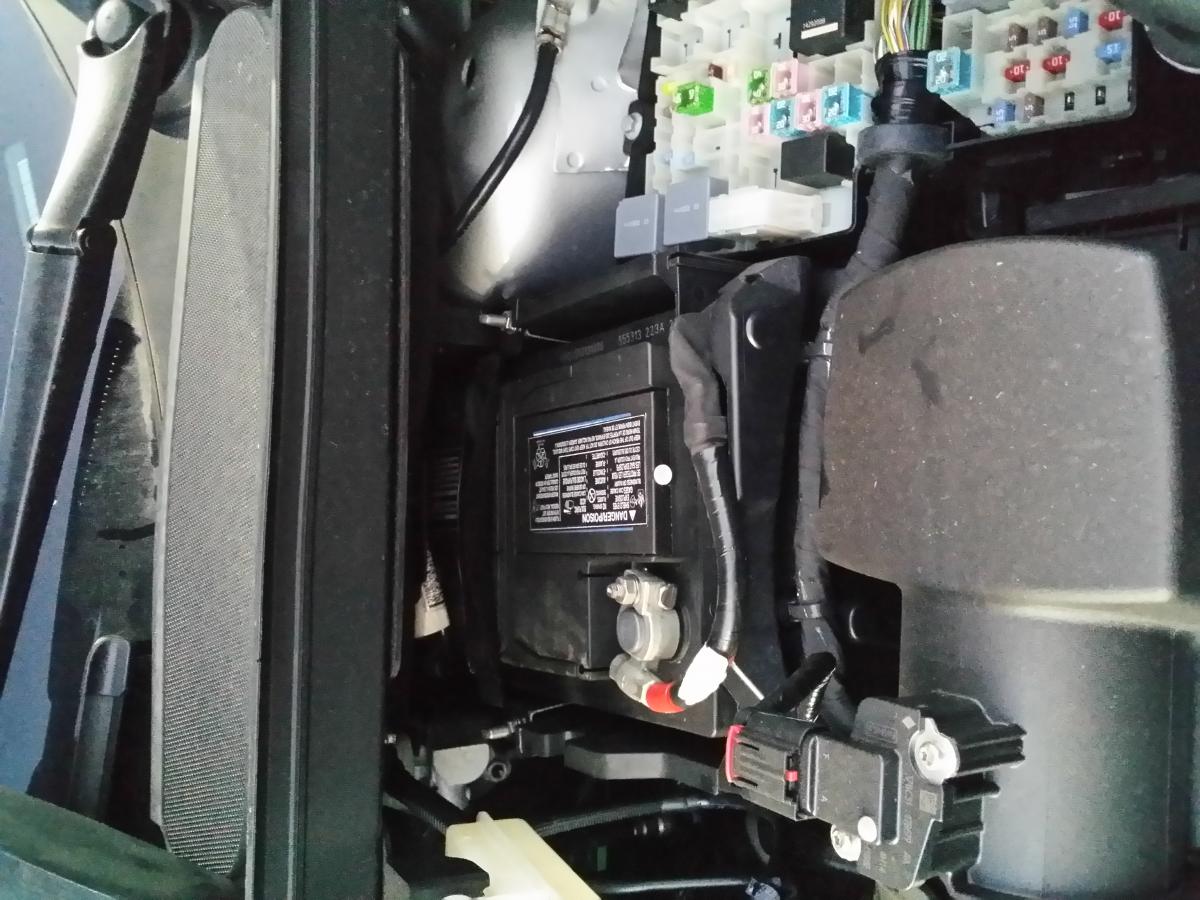
The Ford kit I got for my 2015 TC Wagon instructed you to make the connection, via a 15A inline fuse holder, at the bottom of F1 on the high current junction box mounted to the front of the battery box. My purchase deal included the dealer install of the accessory tow kit so I didn't have to do the work. That being said, I don't really understand why they do it that way unless it's just for universal application. The cargo area fuse block is right next to where they mount the tow wiring adapter and it already has the unused connection at F26 ready for the factory tow wiring. Granted the other side of the circuit isn't wired if you don't order the factory tow package, but it's a simple spade connection to tap the power for a fuse holder in this area. That's what I did to get power when I added my own accessory fuse box. Pix are in the thread I posted: http://fordtransitconnectforum.com/topic/3912-added-my-own-accessory-fuse-box/
Here's a picture pointing out the F1 connection where my Ford kit gets it's power.
-
My 2015 TC wagon had a setting that enhanced the balance for the driver only. It made a noticeable difference.
-
-
130west43rd: Thanks for the complimentary feedback. When I post stuff like that I never know if I'm actually helping others or just exercising my borderline OCD tendencies.
-
.... for example it doesn't have the USB connection because it doesn't have Sync, so I can't find how to charge my phone...
It's not really that hard to add a dedicated set of USB ports for charging wherever you need them. I already had the Sync/USB but wanted USB power elsewhere. Take a look at these two threads I did showing how I modified my 2015 TC Wagon to add extra circuits for accessories.
Getting power from cargo area fuse box: http://fordtransitconnectforum.com/topic/3912-added-my-own-accessory-fuse-box/
Adding USB to overhead shelf: http://fordtransitconnectforum.com/topic/3936-added-usb-power-to-overhead-shelf/
If your 2014 is similarly configured, which in theory it should since they are both Gen2, it should be fairly simple with only basic hand and wiring tools needed. If it looks like something you want to tackle and need some of the small wiring parts I used, let me know. As I mentioned in those posts, there were minimum order quantities on what I bought so I have extras. Or if you aren't good at DIY and you are confident that something like what I did would fit your vehicle, I can prebuild you a long wire set for simple plug in at the cargo fuse box. Then you just have to route the wires, install a USB port where you need it, and connect the wires at that end.
-
I don't think you're going to be able to get the factory options installed later by the dealer. When I inquired about adding a single extra circuit like the Upfitter Wiring Harness option in my TC Wagon it turned out it was not possible. Apparently the way they build them is contrary to common sense. You would think big things like the main wiring harnesses and fuse boxes would all be fairly standard and the appropriate options are just added as needed. But I was told, and my checks of the fuse box and such confirms, that it wasn't possible to add the option later because they don't install any of the supporting hardware if the option isn't included from the factory. They don't even wire both sides of the fuse location in the fuse box if that option isn't ordered.
For example, there is a factory installed tow option. But when I wanted to add it to my vehicle after purchase, it wasn't as simple as getting the factory tow control box and plugging it in. They had to install a different tow controller that required wires to be spliced into the tail light wiring and extra power wires had to be run all the way to the battery. Trying to add sensor warning system would likely be even harder since it interfaces with the sound system, the ABS system, and the image control system for the camera. Even if possible, it's likely to cost a whole lot more than the factory add on cost for that option. You're likely going to need an aftermarket solution.
Based on my experience, I wouldn't put too much stock in the dealer expertise. I had the same attitude when adding items during my recent purchase but now I would just go with DIY or a specialist shop for aftermarket items. Even though my dealer's "trailer wiring specialist" did the work, the wiring job was horrendous. Wires pulled tight across sharp metal edges and 12" of wire cut off the end of the power wire supplied by Ford. If the original length had been left intact and routed better there would have been no risk of wire damage. Other wires added were spliced together unnecessarily so that a wire was red at one end and black at the other end. Too much possibility of confusion. I replaced the dealer spliced wire where possible and added protective wire loom to as much of the rest as possible. I no longer think that the supposed expertise of the dealer service staff and familiarity with the specific vehicle ensures a better job.
-
Visibility is the main reason the liftgate was a must have option for me when I was looking for my new Transit Connect. At first I wasn't sure how big a difference it would make since I was only seeing vans with doors around town. But as soon as I saw a wagon with the liftgate a few cars ahead of me at a traffic light, that big clear expanse of glass had me sold. Most of my daily access to the rear is via the drivers side slider, so the bit of extra effort for the lift gate isn't much of a hassle.
-
That just looks to be a replacement sensor for a failed OEM one if you already have the system installed in your vehicle. Unfortunately if the option wasn't included from the factory, then all the other wiring and parts aren't going to be present to support the sensor installation. Nor are you going to have the integration with the backup camera if you happen to have that option installed also.
You're likely going to need to go with a full aftermarket system like one of these that has parts and instructions.
http://www.autoanything.com/mobile-electronics/74A6346A0A0.aspx
That's just an example I pulled up via a Google search, not one I have any specific knowledge or recommendation for. Looking at the installation instructions for this example, it seems as though it would require both mechanical and wiring skills to do a good DIY installation job.
-
If you mean the warning tone you hear in the vehicle, it only activates if there is an object close enough to the bumper as you are backing. I did some testing after I bought my 2015 TC Wagon and how close depends on the size of the object. A large flat object gets detected farther away, with the tone going continuous about a foot away as mentioned in the manual on pages 128-129. But even with just a single piece of 1/2" conduit sticking up out of the ground in an open flat yard, what I thought would be hardest to detect and thus most likely to hit, the tone went continuous at about 4 inches.
But if you mean a continuous beeping heard outside the vehicle the entire time the vehicle is backing as a warning for others, that seems to be what this add on accessory is for:
Backup Alarm by ECCO
Part No: VAC3Z-14N137-A
SRP: $105.00
http://accessories.ford.com/back-up-alarm.htmlBut it's just a guess because the description is rather sparse.
-
Although I haven't actually done it, I was looking at this on my 2015 TC Wagon right after I bought it about 6 weeks ago. It looks like you need to pull the air cleaner box first, then disconnect the battery positive cable and remove the front section of the battery box that has the high current junction box attached, and that should let the battery slide out the front. But that was just my plan from looking at it in case I ever find the need to do it, I'm no mechanic and haven't actually tried my plan so I could be all wet.
-
For the 2014 and 2015 Transit Connect one HAS to go to the dealer to even get a 'dumb' key made.
Having said that, lets talk about 'smart' keys
TC 2010 to 2013 so long as you have two keys, a owner can program a third or fourth key. If you only have ONE key tough cruncies! it is to the dealer you go
For the 2014 and 2015, one has to go to the dealer to get ANY key and only the dealer can program in anothe key. Even then the dealer has to go to Ford Rotundra to get more keys
There are (is) locksmith(s) that can make 2010 to 2013 keys but EVERYBODY will demand proof of ownership and for the dealer the VIn number is required.
Be aware that Ford only keeps VIN numbers for 10 years, that is you give them a VIN number and they can cut the key according to what the VIN information has
Per the manual included with my 2015 TC Wagon, you can still do key programming yourself on the TC Gen 2. It's one of the things I checked prior to purchase. I had a Nissan in the past that required dealer programming and it was inconvenient and expensive. Thankfully, my TC came with the $65 optional 2 extra keys. Even so, I also got an extra $25 dumb key to put in my wallet in case of lock out. The dealer was able to cut it.
(from Transit Connect manual, pg 59-60)
"Programming a Spare Integrated Keyhead Transmitter
You can program your own integrated keyhead transmitter or standard SecuriLock coded keys to your vehicle. This procedure will program both the engine immobilizer keycode and the remote entry portion of the remote control to your vehicle.
Only use integrated keyhead transmitters or standard SecuriLock keys.
You must have two previously programmed correctly coded keys and the new unprogrammed key readily accessible. See an authorized dealer to have the spare key programmed if two previously programmed correctly coded keys are not available."
-
I got a chance to test the access without removing the shelf.
Unfortunately it was because I forgot to reconnect the microphone cable when I reinstalled the shelf.
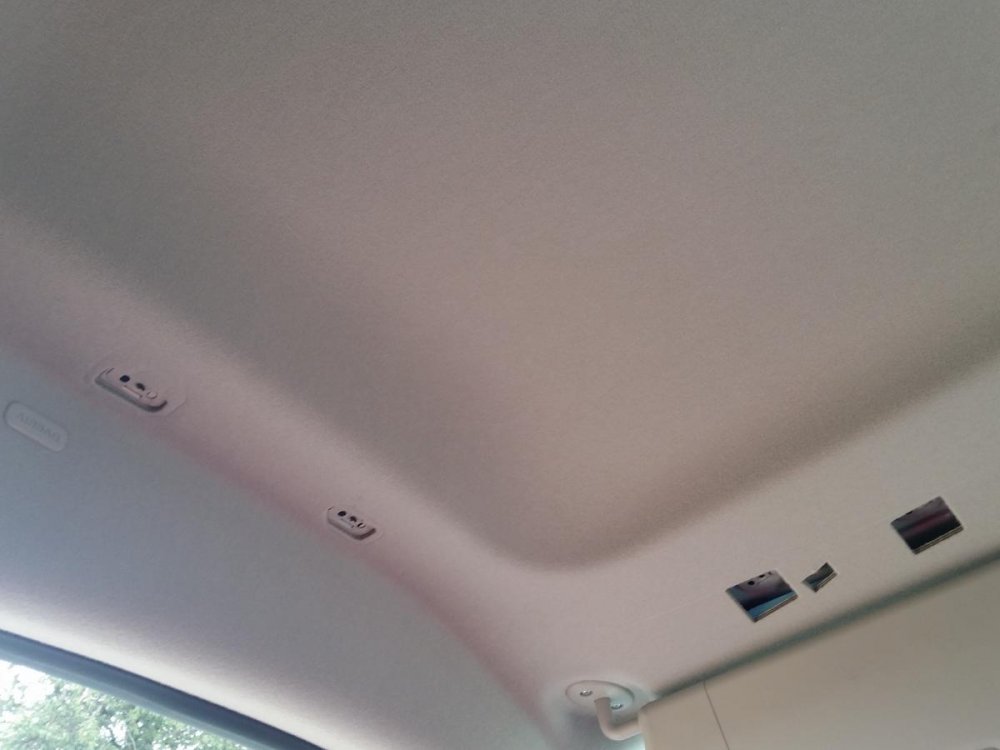
The center riser with the USB port installed does come loose fairly easily so the USB port could be installed without removing the shelf. But the access to the wire cutout in the headliner is too tight. But the good news is that you don't need to fully remove the shelf like I did. If you leave the screws installed on both ends (where the grab handles are) and just remove the 4 middle screws (2 under each visor), the center of the shelf drops down far enough to reach in and do any wiring connections needed. Much easier and quicker than removing the shelf entirely.
-
-
As easy as it was to install the USB power point, it likely could have been drilled out and installed even without removal if your hands are small enough.
This is the USB power point I installed: http://www.amazon.com/gp/product/B00KIIO7GC?psc=1&redirect=true&ref_=oh_aui_detailpage_o00_s00
But for me, with fat guy sausage fingers, removal was a must. I also decided to drill the hole undersize then enlarge it with a file so that I could match the flat sided shape of the USB power point so it won't twist during use. I used a step bit and drilled the starter hole to 1 inch, the width of the flat sides. Then I used a half round hand file to expand the top and bottoms to fit the 1-1/8" overall diameter of the USB power point. But the single step of using a 1-1/8" hole saw would have worked just as well and is what I would do if trying to do it without removing the overhead shelf.
 If you're wondering about the orange item visible in the photo above, it's a whistle that's stored in the space reserved for the sunglass holder that my TC did not come equipped with. I always keep a glass breaker, seatbelt cutter, and whistle in reach of the driver and this dead space was the perfect size.
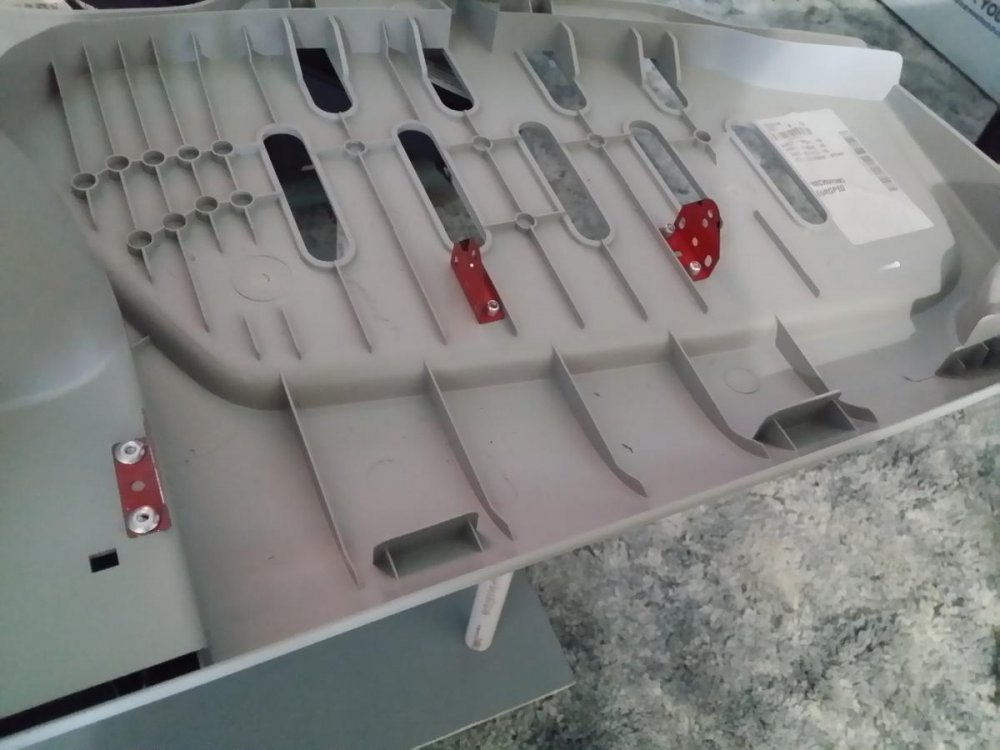
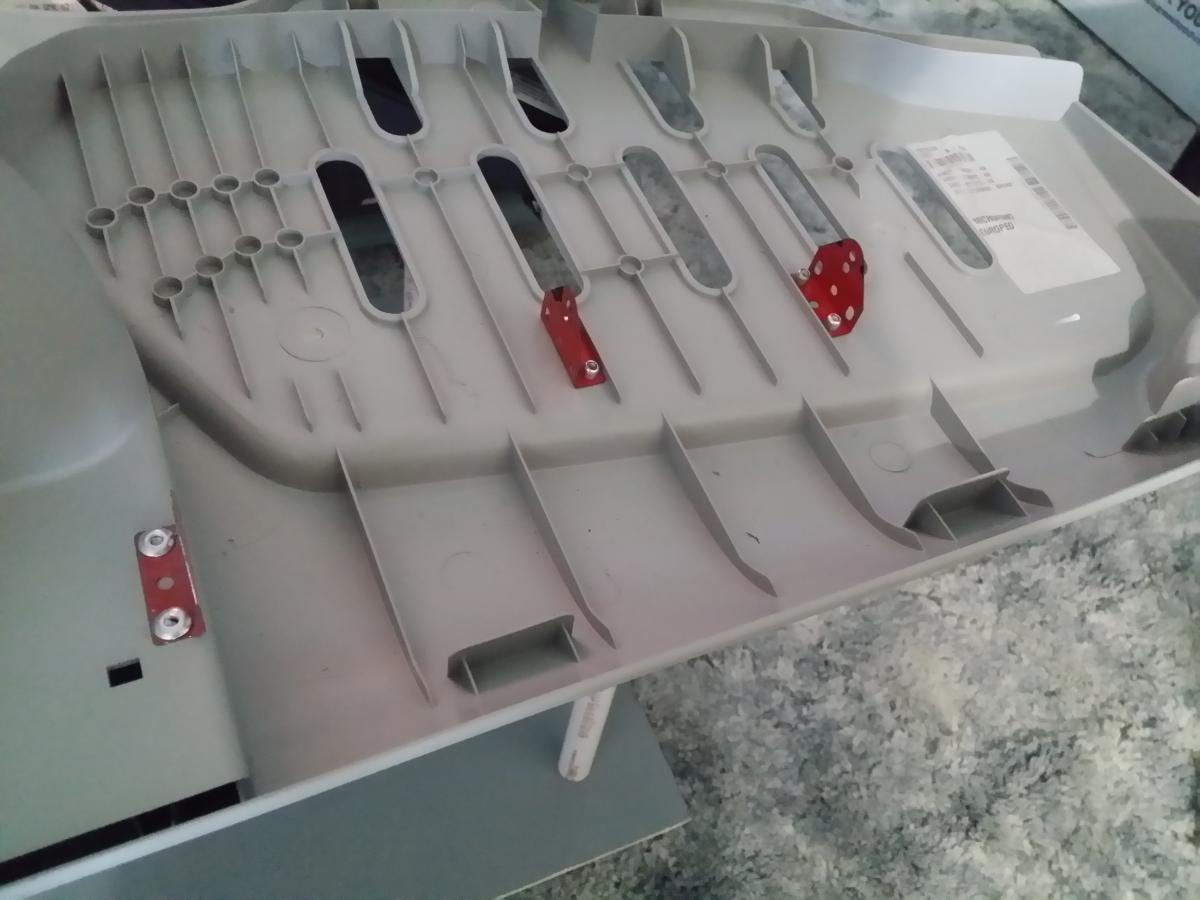
While I had the shelf out, I also added some small dividers (spares from my Erector set collection) to keep items from sliding around.
-
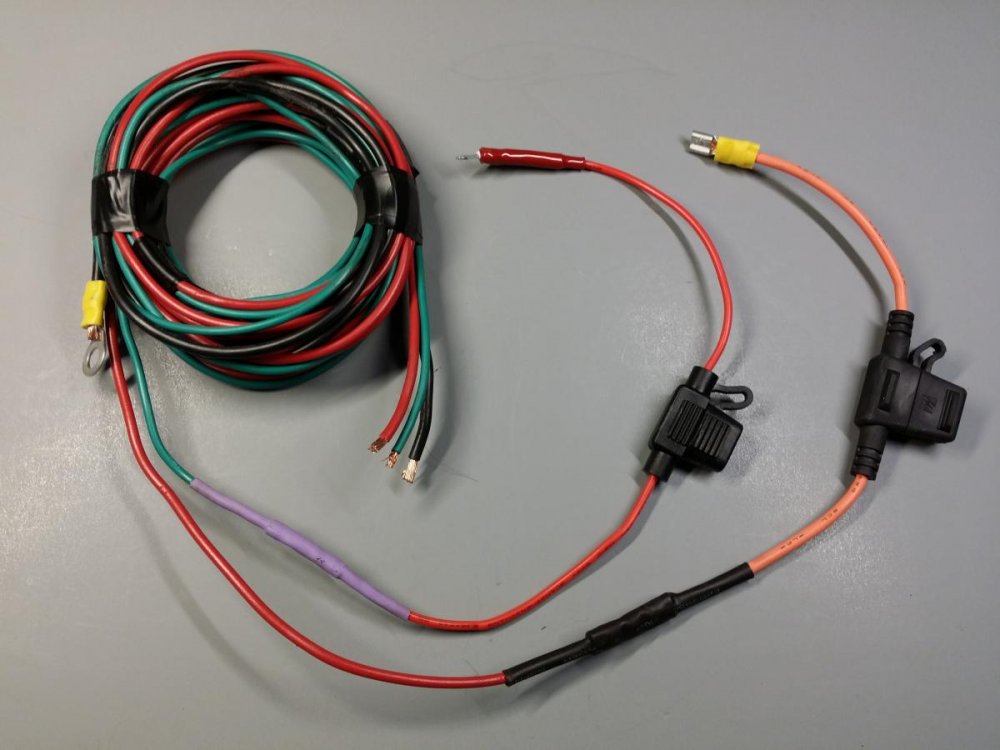
Running the wiring was fairly straight forward. I did a test run for length with the split loom tubing alone and then cut the wires to length and did all the crimping and other wire work comfortably indoors. I used an 8-1/2 foot length of wire but it was just barely long enough at install once everything was routed neatly. If I were to do it again, I would use at least 9 ft and maybe even 10 ft to make the connection at the shelf easier to reach.
Under the headliner
 Down the A pillar
 Down into the dash
 And connect to the FZ-1 FuzeBlock I added earlier ( Details in this thread: http://fordtransitconnectforum.com/topic/3912-added-my-own-accessory-fuse-box/ )
-
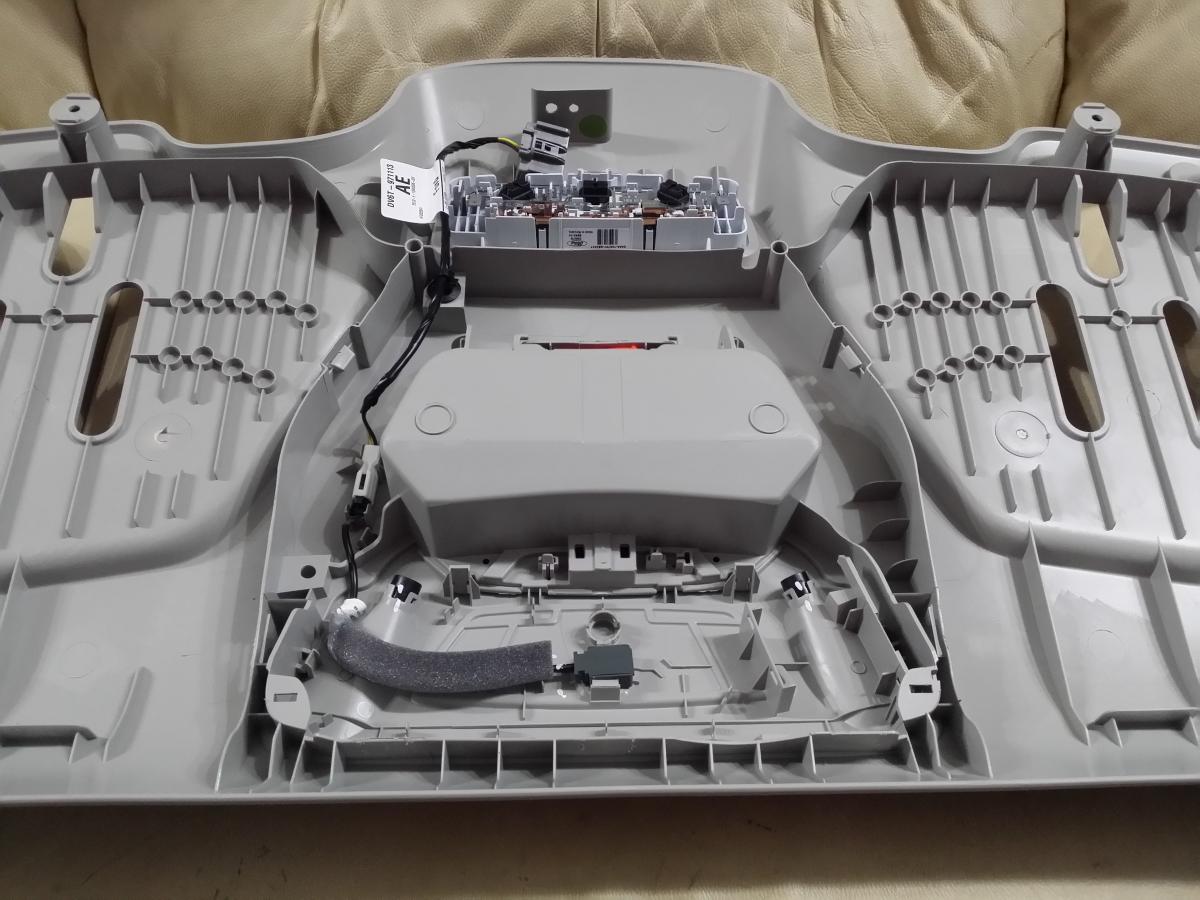
Here's how I added a USB power port to the overhead shelf on my 2015 TC LWB Wagon. I'll break the posts and pictures up for easier reading.
I hate dangling wires so I wanted an overhead power supply for my dash cam. Rather than add yet another cigarette lighter socket for the plug in adapters that come with these type of accessories, I decided to go with a USB power port instead since they almost always use a 5v mini or micro USB plug anyway. Far more flexibility in cabling this way also instead of relying on what the manufacturer decides to supply.
The First step was to remove the overhead shelf. There are four screws on each side, the two at each end of the handholds are under the covers, the other two in each side are readily visible once the visor is flipped down. As it turns out, I likely could have skipped this step since the riser piece in the middle where I wanted the power port mounted has nothing connected to it and the release tabs are all accessible with the shelf installed.


-
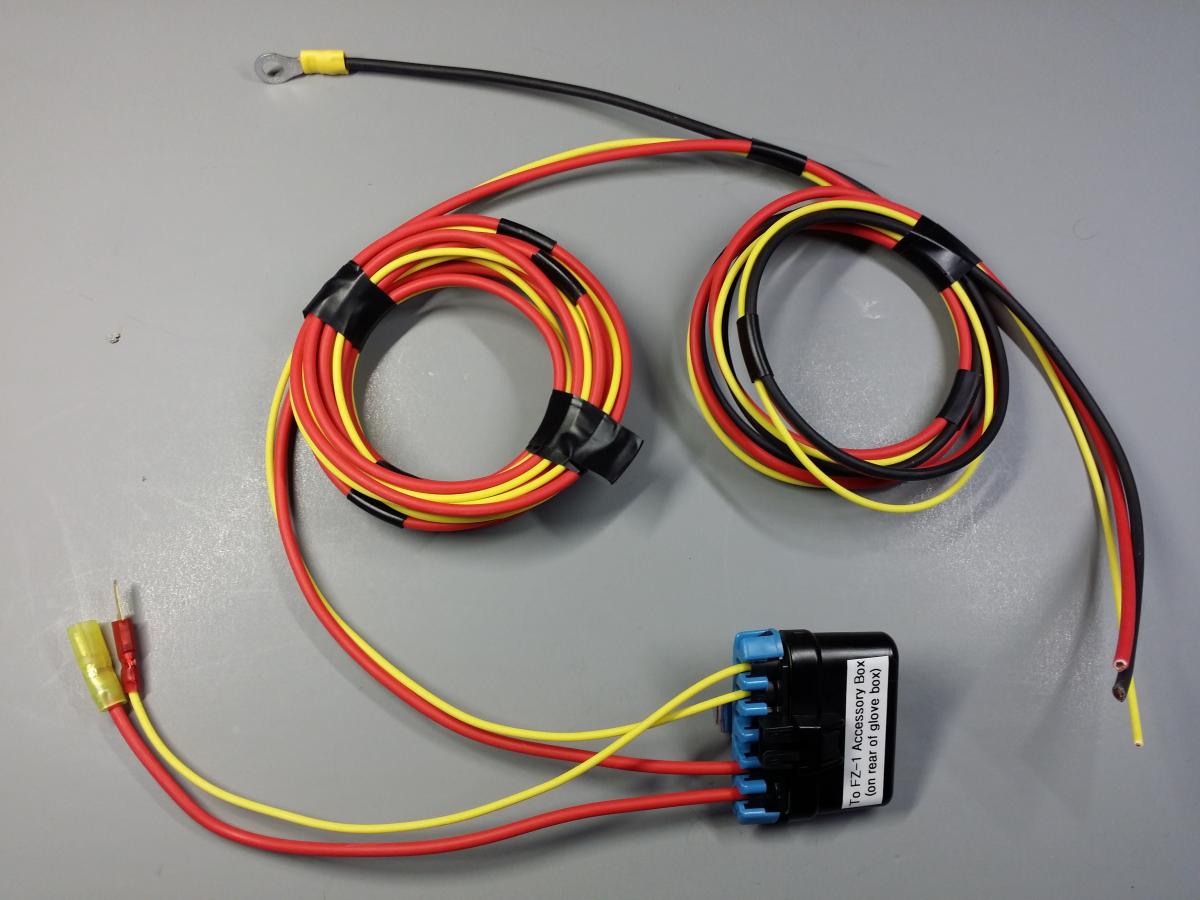
There are a couple very minor changes I would make if I were doing it again. I didn’t know exactly how long of wires I would need or where I would mount the extra fuse holder, so I left the wires long enough to reach well out of the panel to make it easier to properly attach the fittings on the wires. A nice neat job can’t have too much extra wire hanging out so I would shorten everything to just enough spare wire for later repairs to the ends if needed. Similarly, instead of running wires to the bottom as I did initially, I would route the wires on top of the cargo area fuse block closer to where I finally ended up mounting the extra fuse holder. And I would prebuild all connections in a comfortable work area for the best crimp jobs and such I can manage.
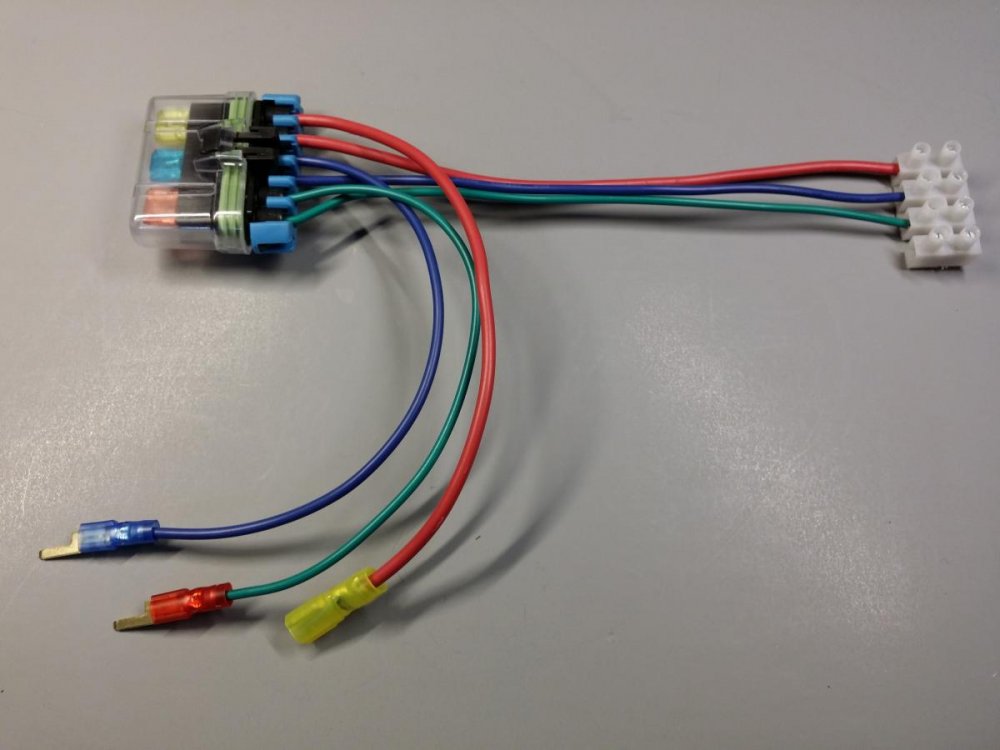
Oh wait, I’ve got lots of extra parts! So I did exactly that and built a second wire harness. It's just too tempting to start playing around when you have a ton of extras laying around. I also decided to build another version that’s just a break out to add a convenient wiring terminal strip for any future needs. I didn’t want to install it yet since I don’t actually need it but I wanted to see how it would fit so I used the mount/cover I installed for the FZ-1 harness.
I’ve already started thinking about and researching parts for the next upgrade, adding power points up in that nice roomy headliner shelf.

-
I removed the lower right cargo trim panel to run and mount the wires. And then removed both right sided door sill trims. Everything uses either those friction fit pins that you can just pull loose or plastic rivets where you just pry up the center button then pull out the rivet. Finally, I removed the glove box. This was the only spot that gave me trouble but mostly due to trying to do the work around midnight to beat the Texas heat and not seeing the removable BLACK hinge pins on the bottom of the glove box. If you don’t point the flashlight correctly, it’s amazing what you can miss in the dark even with your nose 3 inches away from the part. But they just pull out, towards the center of the glove box, and then a little twist of the glove box to clear the catches and then it comes out easily.
I decided to mount the FZ-1 to the back of the glove box. Not as easily accessible as inside the box or on the dash itself, but more protection for the wires while still keeping fairly easy access (once you know what you’re doing) by pulling out the glove box. For the ground connection, I used 12ga wire to the ground screw under the middle of the front passenger door sill trim. For the constant and switched power leads, I fed one 12ga and one 18ga wire from the rear cargo fuse block up to the FZ-1 Fuzeblock up front. I was following the routing of the power wire previously installed by the dealer when they installed my Ford accessory trailer hitch as part of the purchase deal.
Here's my Photo Album with photos of the wire routing.
Underneath the right rear trim panel. Also note the Ford trailer wiring controller near the fuse box

Behind the AC duct in front of the wheel well. There were even a couple unused holes that were perfect for the zip tie mounts.

Unfortunately, I didn’t think to start taking photos until I already had the door sill trim pieces reinstalled.

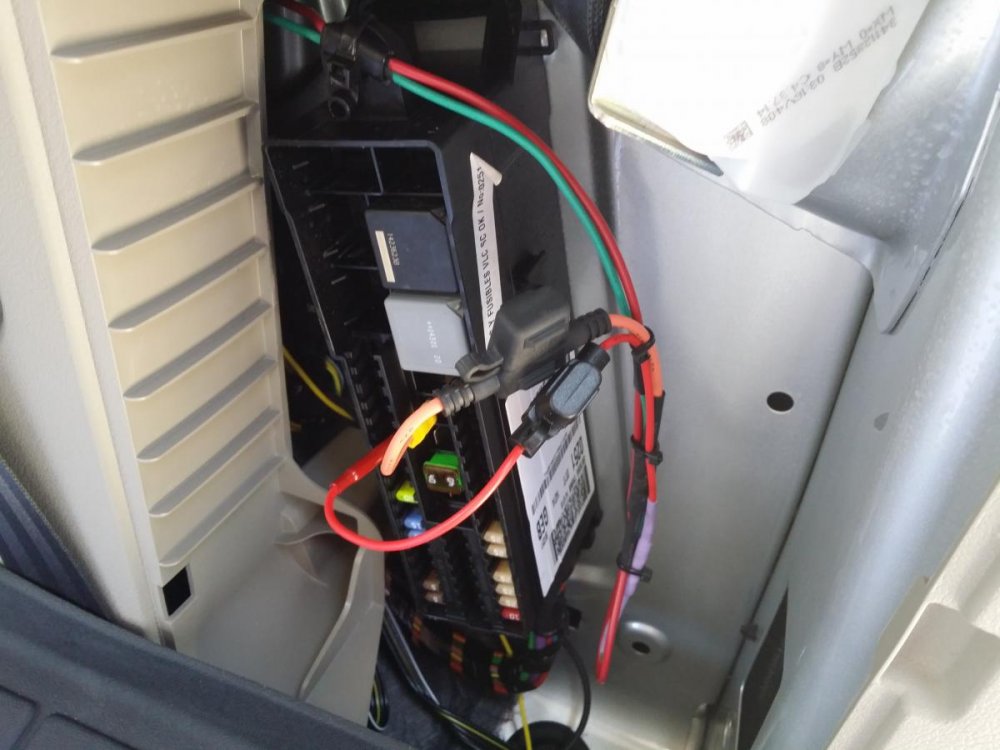
Wires exiting behind removed Glove Box. Also note BCM fuse box on firewall.

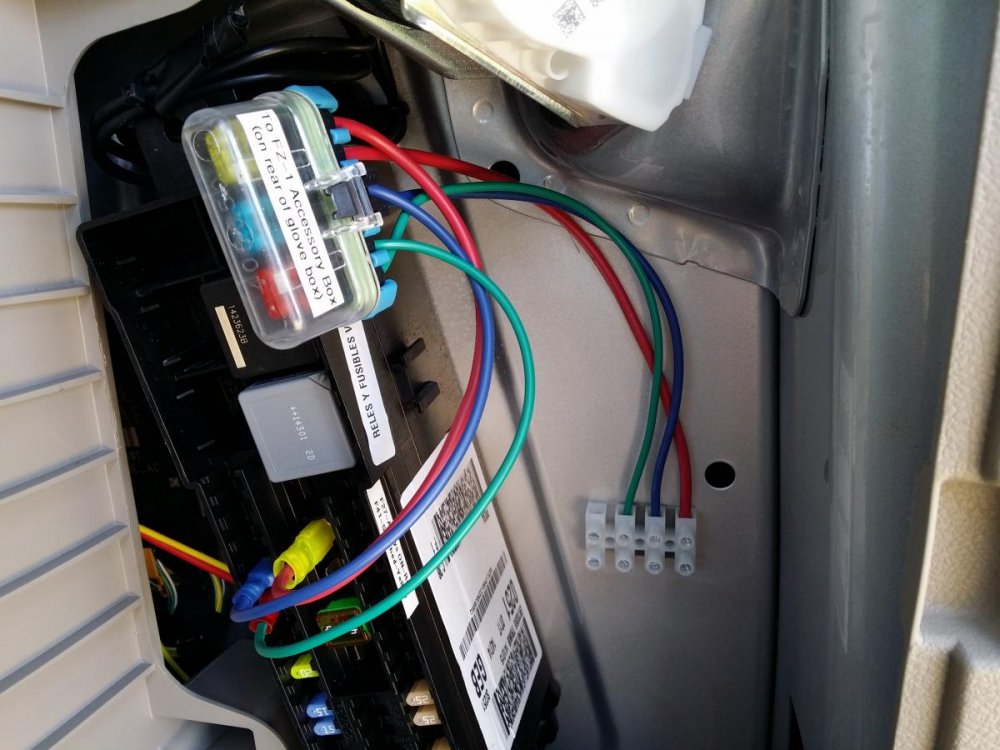
FZ-1 Accessory fuse block all wired up
UPDATE: Don't mount anything where I have that small accessory power brick clamped! This morning when I was under the dash investigating a mystery fuse at F61, I noticed that piece was pressed up against one of the wiring harnesses when the glove box was closed. I relocated it and won't be mounting anything to that portion of the glove box any more, the clearances are too tight and I don't want to risk damaging the OEM wiring.
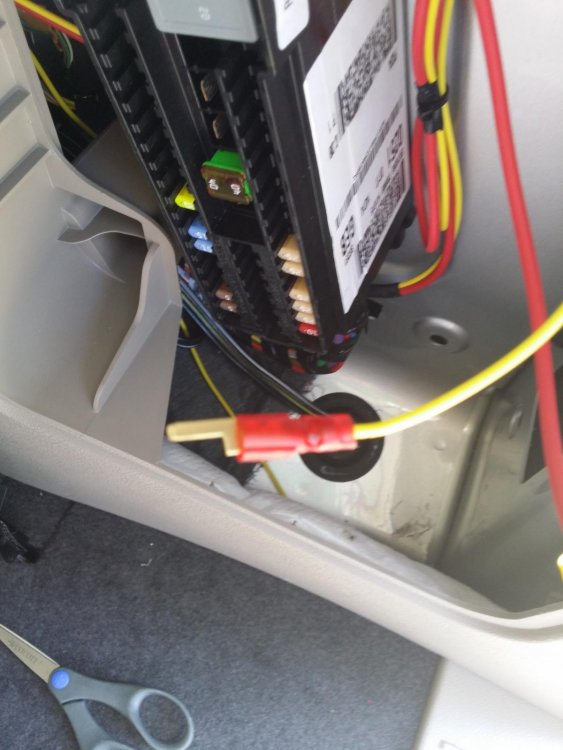
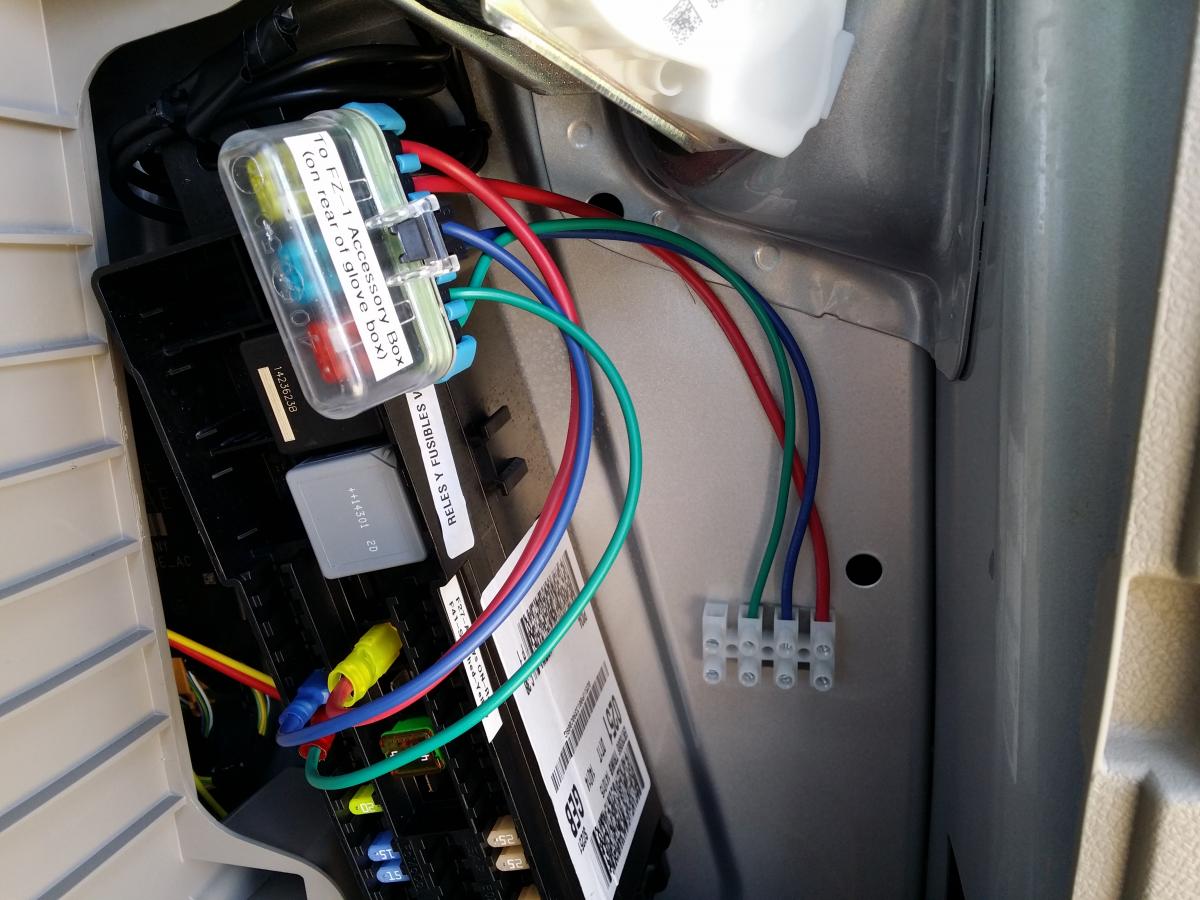
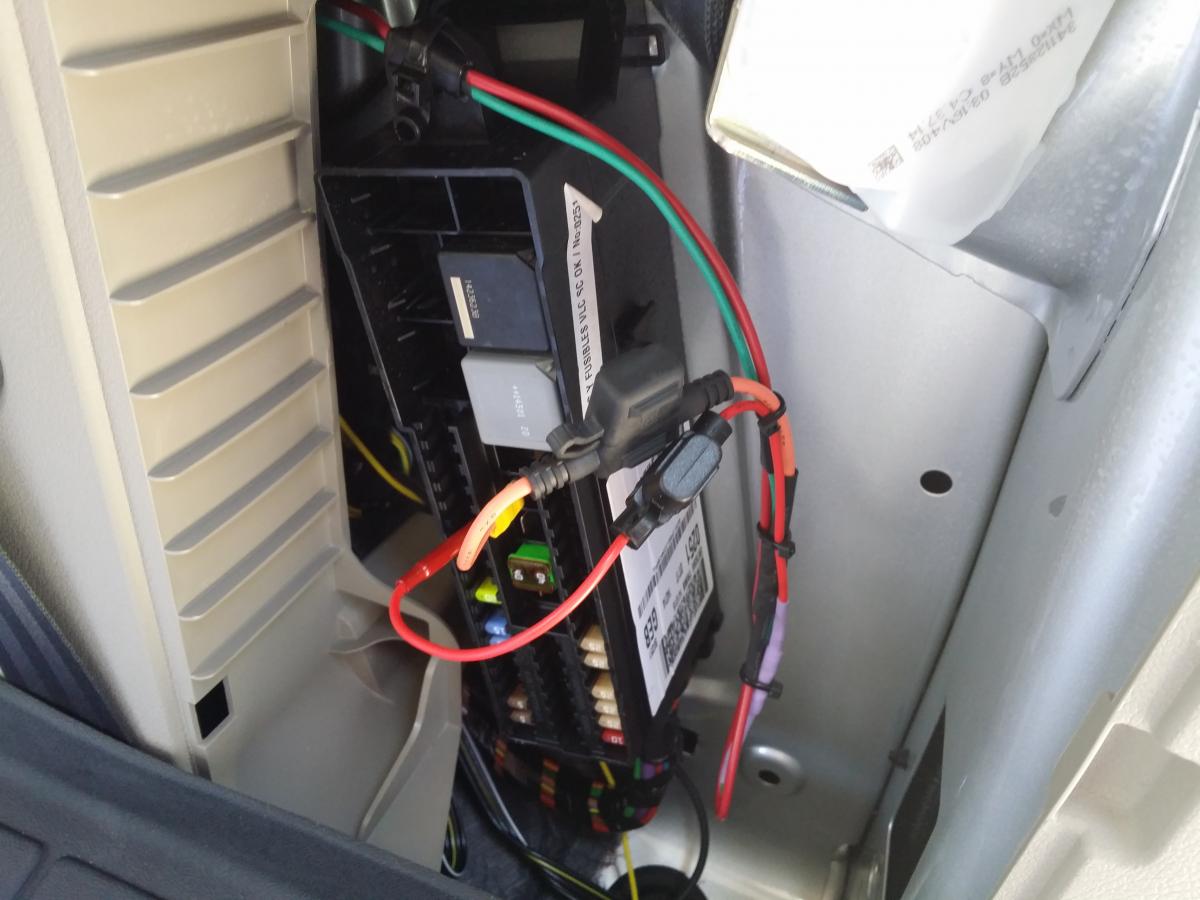
Fuse holder installed on wires at cargo area fuse block Initial location I tried mounting the fuse holder
 Final location where fuse holder was mounted. Better access and appearance
-
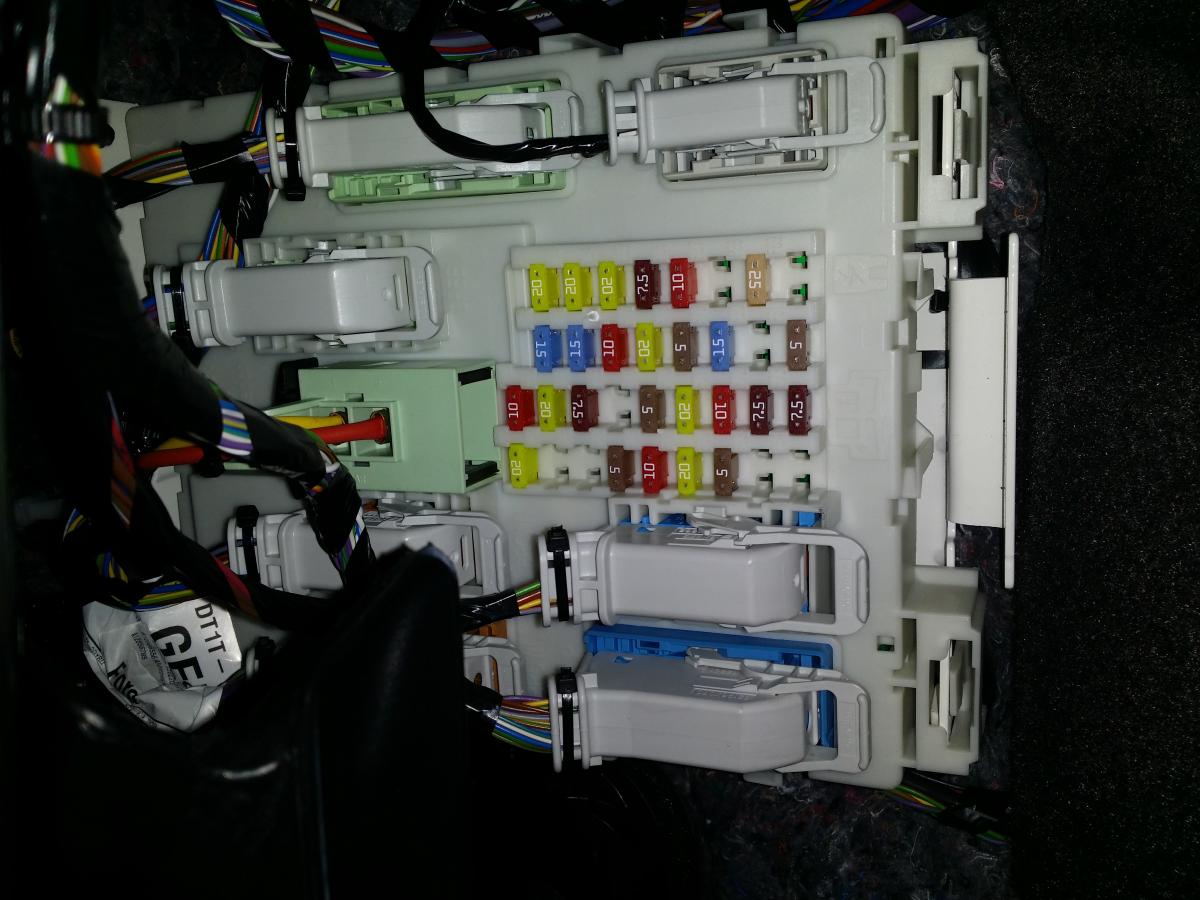
The Transit Connect wiring is not very DIY friendly for direct battery wiring, or using either of the engine fuse blocks. And even though the passenger footwell fuse block is closest to where I needed power, it was not very usable for a neat and well protected wiring project. It is also part of the BCM and not being much of a car guy, I took to heart the numerous warnings I was reading from various sources about the potential dangers of trying to tie extra circuits in to the BCM. So that set of fuses was off limits too.
But the fuse block in the cargo compartment is nearly perfect. It is easily accessible, has plenty of spare fuse slots, and is in a large recess with plenty of room to work. And since it already has it’s own Auxiliary Ignition Relay controlled by the BCM, it has both switched and constant power available. So in the end, the best solution was to mount the FZ-1 Fuzeblock up front where power was needed and supply it with a long wire harness running down the right side of the vehicle to connect it to the rear fuse panel.


-
The first find that met my needs was the FZ-1 Fuzeblock to act as a convenient wiring point for accessories like my dash cam and phone charger. The big draw for me was the ease of use. Six screw terminals for extra circuit wiring, built in relay for switched power, and making any circuit switched or constant just by moving the fuse for that circuit to the appropriate set of contacts. http://www.amazon.com/gp/product/B00L3OJW4C?psc=1&redirect=true&ref_=od_aui_detailpages00
The second find was the Delphi Metripack 6-Way Female Inline connector that lets you build a waterproof, direct wired (no splices), triple fuse holder that is very similar to the OEM connectors used throughout the vehicle. The only downside is that you need a variety of sizes of numerous small parts to fit assorted wire sizes and most of the smalls had minimum order quantities of 100, so the parts bill climbs quickly. On the plus side, I have enough leftovers to do another 4-5 vehicles the same way mine was done and another 15-20 smaller setups. So if anybody else wants to try something similar and needs the parts, I can hook you up without the extra cost of those stupid minimum quantities. http://www.waytekwire.com/item/38076/Delphi-12059573-Metri-Pack-280-Series-6-Way/
The final find was alongside the 6-Way Connector and provides a nice way to tap power from the supply side of those spare fuse slots. It’s a brass fuse leg with a spade connector on the other end for connecting your wires. http://www.waytekwire.com/item/37065/Mini-Tapper-Fuse-Clip/
I also decided that since I was already spending way too much, I might as well go all the way and upgrade the wire also. Instead of the standard primary wire from the auto store, I went with some more temperature and abrasion resistant wire since it was going to be running under trim. Better safe than sorry. http://www.wirebarn.com/GXL-Automotive-Wire-by-the-Foot_c_29.html
-
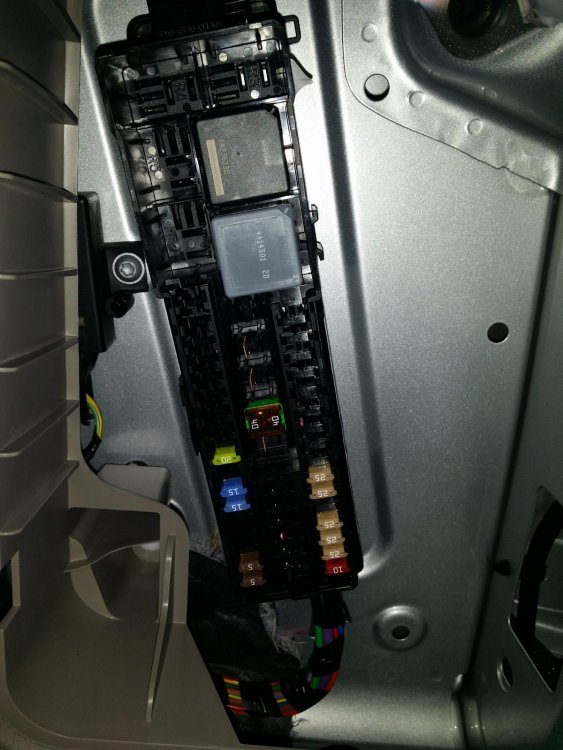
When I purchased my 2015 Transit Connect Wagon, the dealer said it would be no problem to add a couple extra circuits for accessories at one of the fuse boxes. After working my way through several sales and service staff members, the “wiring specialist” finally determined that what I wanted was not possible since the spare fuse slots have no connections on the load side (see F43 at top left in photo below) and Ford won’t supply the parts to add them. So in the end I had to come up with my own solution. And knowing wiring but not cars, my first purchase was the wiring diagram book. I may not know how everything shown in it works, but I can make sure I only tie into something I can see documented and feel confident I understand. Initially I tried the basic auto store inline fuse holders with converted fuse legs as power taps. Although the connections were pretty good quality, strong silver solder and multiple layers of heat shrink, I didn’t like the holders just hanging loose and there were too many potential failure points. So after some searching I found some parts that make for a nice clean, almost bulletproof, wiring harness for accessories.
I’ll apologize in advance for the length of this post up and I'll try to break it up into readable sections with a few photos each. I know I have a tendency to overdo the story telling, but I wanted to share what I learned along the way and why I chose to do it that way in the hopes it helps others with similar projects.


Remove rear seats from the wagon
in 2014 Ford Transit Connect
Posted · Edited by DonShockley
It was 1/4" rubber mat sold by the foot at Tractor Supply.
http://www.tractorsupply.com/tsc/product/rb-rubber-multi-mat-rolled-rubber-1-4-in-thick-sold-by-the-foot?cm_vc=-10005
They also have 3/8" if you need more wear or more strength if you go over the carpet instead of over plywood like I did.
http://www.tractorsupply.com/tsc/product/rb-rubber-multi-mat-rolled-rubber-3-8-in-thick-sold-by-the-foot?cm_vc=-10005
However, you should know that the thickness you see at the rear of the earlier photo is actually 3 layers of the 1/4" glued together. I stopped the plywood short of the plastic trim at the rear so that the wood wouldn't damage the trim. But this left a 6 inch gap at the rear. When I added the mat, I ran the main piece long past the end of the wood and used 2 more layers underneath to fill the gap. I can just flip it up to access the spare tire lowering mechanism.